Flare has a powerful and flexible tool called relationship tables, which allow you to group related topic pages, and also include one or more concept and reference links.
A “concept” link typically displays a page that relates to all the tasks in the table, such as a higher level overview or summary. A “reference” link can provide background or related information to what users find in specific task pages.
As users click through the various topic pages, the concept and reference links remain in view at the top and bottom of the relationship menu, as you’ll see in the example below.
Relationship tables are typically used in the top navigation format, replacing the mini table of contents that displays flush right on topic pages.
Note: I’ll assume you’re familiar with master pages, proxies, blocks, and viewing either the MainStyle.css file (part of the Flare top nav template) or the default CSS style file in your custom project.
The following example involves instructions for doing invoices.
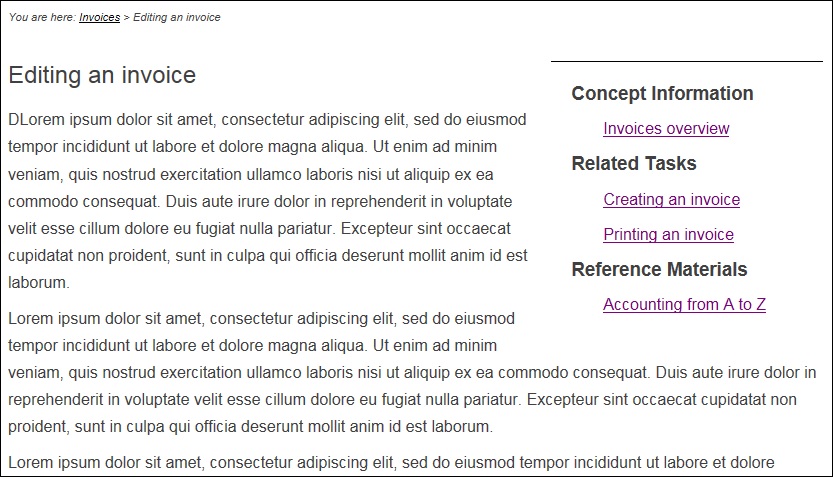
Let’s assume you have three topic pages describing three invoice tasks: creating an invoice, editing an invoice, and printing an invoice. You also want to include an invoice overview topic page – the “concept” that applies to all three tasks, as well as a reference page, in this case “Accounting from A to Z”.
The completed relationship table will display on each invoice topic page, in the upper right corner, with the text on that page wrapping around the outlined relationship box:

We’ll break this down into three steps:
-
- Create a relationship table in Flare containing links to each of five topic pages.
- Edit the master page by inserting and then format the relationship proxy.
- Select the relationship table in the Relationship tab of the online target.
A word about CSS before we continue
In order to position the relationship table flush right on each topic page, with some space to the left and to the bottom, you must have the div.sideContent class in your main CSS file. Open this file in the internal text editor and search for it.
In the MaintStyle.css that comes with the top nav templates, it’s located around line 235. If you can’t find it, insert it:
div.sideContent
{
       float: right;
       margin-left: 10px;
       margin-bottom: 10px;
       width: 33.33%;
}
Step one: Create the relationship table
- With the Flare project open, display the Project Organizer pane.
- Right click on the Advanced folder, and select New > Relationship Table.
- In the Add File dialog, enter a name for the table in the File Name field, e.g., Invoices, and click Add.
- Flare displays a single-row table in the Editor window, with the headings Row Name, Concept, Tasks, and Reference.
- Right click the Row Name cell and select Row Properties.
- In the Row Properties dialog, enter a row name in the Row Type field, e.g., Invoices, and click OK. The row name does not display in the help – it simply identifies that row. A relationship table can have multiple rows but each row must have a unique name.
- Switch to Content Organizer and drag the Invoices Overview topic into the Concept cell.
- Drag the three tasks into the Tasks cell, and then:
- Use Ctrl click to select all three tasks.
- Right click and select Cell Properties.
- In the Cell Properties dialog, set the Collection Type to Family. This groups the tasks.
- Click OK. The tasks are now green.
- Drag the Accounting from A to Z topic into the Reference cell.
Your relationship table should look something like this:

Save your changes.
Step two: Insert the proxy into the master page and apply formatting
Now you’re ready to insert the relationship proxy into the master page and apply the div.sideContent class so it displays in the upper right corner of each topic page, with text flowing around it.
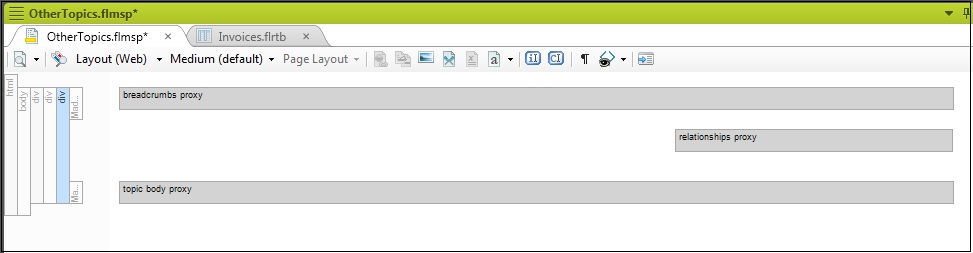
- In Content Explorer, open Resources > MasterPages > OtherTopics.flmsp. If you’ve set up a different master page for all the topic pages, open it.
- Use Flare’s block selector feature to select and delete the mini-toc proxy if it’s present in the master page.
- Use Insert > Proxy > Insert Relationships Proxy to insert the proxy between the breadcrumbs proxy and topic body proxy. You may to fiddle with the insertion point to get it in the right place before inserting the proxy where you want it.
- Click the proxy block on the left to select both the block on the left and the gray proxy bar to the right.
- Press Tab to display the Create Group dialog.
- Select div.sideContent and click OK.
The Relationship proxy displays flush right:
Save your changes.
Step three: Activate the relationship table in the target
- Open the online target for the project.
- Click the Relationship Table tab.
- Make sure there’s a check mark next to the Invoices relationship table entry.
- Save all changes.
- Build and view the project.
The invoice pages should display the relationship menu upper right:
Notes
- You don’t have to format the proxy so it displays flush right, forcing text to flow around it. Simply insert the proxy into the master page near the bottom, and it will display flush left below any content on a topic page.
- To change the position of the relationship menu on the page, open the MaintStyles.css file (or your default CSS file) in the Advanced view, scroll down to div.sideContent, and expand the Box settings on the right. You can change the margins and the percentage width.
- To change the appearance of the relationship menu, e.g, add or remove borders, select the block for the gray proxy bar on the master page, right click on it and select Paragraph and choose your formatting.
- Relationship tables replace the mini-toc proxy, which means you will have to create relationship tables for any and all topic pages you to use this feature for. If there is no relationship table for a topic page, no relationship menu appears on that page and the text runs full width.
- You can omit the Concept link and the Reference link and just display related tasks if you want.
- For more details on relationship tables, check the Navigation Links Guide PDF that comes with Flare (click Help > PDF Guides).

Stephen is a senior technical writer with more than 20 years experience writing for corporate and hi-tech clients in Vancouver and Toronto. He is the past president of the STC Canada West Coast chapter.